
Study Memory Work
[K8S/CKA 자격증] Services & Networking - Service 동작 원리, Cluster IP, NodePort 본문
Infra/Kubernetes
[K8S/CKA 자격증] Services & Networking - Service 동작 원리, Cluster IP, NodePort
Hera Choi 2023. 1. 22. 21:02- Podnetwork : CNI(Container Network Interface plugin)에서 관리하는 pod 간 통신에 사용되는 클러스터 전체 네트워크
ServiceNetwork
- Service discovery를 위해 kube-proxy 가 관리하는 Cluster-wide 범위의 Virtual IP
- 동일한 목적을 가지고 서비스 중인 pod들이 균등하게 서비스될 수 있도록 loadbalancer 역할을 하는 것.
- service를 생성하면 단일진입점인 clusterIP(LB IP)가 할당된다.
- clusterIP를 통해 접속하면 iptables Rule에 의해 연결된 서비스 중 한 곳으로 연결된다.
LB IP(Cluster IP)를 생성하여 Loadbalancer운영을 해주는 것이 바로 Service!
- ClusterIP로 접속하면 각 node내에 있는 iptables rule을 이용하여 loadbalancer하게 된다.
- Kube-proxy
- 각각의 Node에서 실행되고, Kubernetes ServiceAPI에 정의된 서비스를 각 노드에서 반영
- root권한을 가지고있으며, Service가 생성되면 커널에 iptables rule을 설정하도록 명령하고 외부 네트워크와 Pod를 연결시킨다.

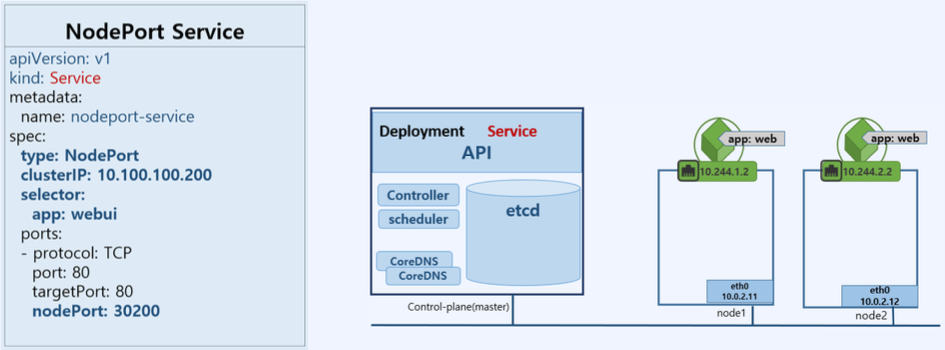
- Service 설정 예시

Service Type
범위에 따라 세가지로 나뉨.
- ClusterIP(default) : Pod 그룹(동일한 서비스를 지원하는 Pod 모음)의 단일 진입점 (Virtual IP:LB) 생성
- NodePort : ClusterIP 가 생성된 후 모든 Worker Node 에도 외부에서 접근이 가능한 Port를 열어준다. (port forwarding)
- LoadBalancer : 클라우드 인프라스트럭처 (AWS, Azure, GCP)에 적용 LoadBalancer를 자동으로 프로 비전하는 기능 지원
Cluster IP
- selector의 label이 동일한 Pod들을 그룹으로 묶어 단일진입점(Virtual_IP)을 생성
- 클러스터 내부에서만 사용 가능
- service생성 시, yaml파일에서 Service type 생략시 default로 설정되는 Type
- 0.96.0.0/12범위에서 랜덤하게 할당됨
NodePort
- 모든 노드를 대상으로 외부 접속 가능한 포트를 예약
- Default NodePort 범위 : 30000-32767
- ClusterIP를 생성 후 모든 worker Node에 랜덤으로 NodePort를 지정해준다.
- 클라이언트 사용자가 클러스터내가 아닌 외부에서 NodePort로 접근할 수 있다.
[실습]
동일한 서비스를 제공하는 Pod그룹에 ClusterIP생성하기
deployment name: web , image:nginx, port:80, replicas:2 , ervice name: web, type: clusterIP, port: 80
# 1. pod 생성
$ kubectl create deployment web --image=nginx --port=80 --replicas=2
$ kubectl get pods

# 생성한 deployment pod에 service api 생성
$ kubectl expose deployment web --type=ClusterIP --port=80
[문제1] ClusterIP type의 서비스 운영
작업 클러스터 : k8s
'devops' namespace에서 운영되고 있는 eshop-order deployment의 Service를 만드세요.
- Service Name: eshop-order-svc
- Type: ClusterIP
- Port: 80
# 1. pod 정보 가져오기 (label, port)
$ kubectl get pods -n devops -o wide
$ kubectl describe pod -n devops {pod명}
	# label과 port 정보 추출

# 2. service 생성
$ kubectl expose deployment -n devops eshop-order --name=eshop-order-svc --type=ClusterIP --port=80 --target-port=80
												# --target-port : 위에서 추출한 Pod port

# 3. 확인
$ kubectl describe svc n devops eshop-order-svc
$ ssh {ClusterIP}
[문제2] Pod를 이용한 Named Service 구성
작업 클러스터 : k8s
- 미리 배포한 'front-end'에 기존의 nginx 컨테이너의 포트 '80/tcp'를 expose하는 'http'라는 이름을 추가합니다.
- 컨테이너 포트 http를 expose하는 'front-end-svc'라는 새 service를 만듭니다.
- 또한 준비된 node의 'NodePort'를 통해 개별 Pods를 expose되도록 Service를 구성합니다.
# 1. front-end deployment yaml 파일 수정
# 2. service 생성
$ kubectl get deployment font-end -o yaml > dep.yaml
$ vi dep.yaml

###
apiVersion: v1
kind: Pod
metadata:
  name: front-end
spec:
  replicas: 2
  selector:
    marchLabels:
      run: nginx
  template:
    metadata:
      labels:
        run: nginx
    spec:
      containers:
      - name: nginx
        image: nginx
        ports:
        - containerPort: 80
          name: http

---
apiVersion: v1
kind: Service
metadata:
  name: front-end-svc
spec:
  selector:
    run: nginx
  ports:
  - name: front-end-svc-port
    protocol: TCP
    port: 80
    targetPort: http
  type: NodePort
###

# 3. deployment, service 실행
$ kubectl delete deployment front-end
$ kubectl apply -f dep.yaml

# kubectl edit srv front-end-svc 명령어를 이용하여 service를 수정할 수 있음.
[문제3] Access the Service from outside the Cluster via NodePort
작업 클러스터 : k8s
- 'front-end' deployment의 nginx컨테이너를 expose하는 'front-end-nodesvc'라는 새 service를 만듭니다.
- Front-end로 동작중인 Pod에는 node의 30200포트로 접속 되어야 합니다.
- 구성 테스트 curlk8s-worker1:30200 연결 시 nginx 홈페이지가 표시되어야 합니다.
# 1. 'front-end' deployment 존재여부 체크, label 및 port 체크
$ kubectl get deployments | grep -i front
$ kubectl describe pod front-end-@@ | grep -i -e port -e labels


# 2. 'front-end-nodesvc' service 만들기
$ kubectl expose deployment font-end --name front-end-nodesvc --port 80 --target-port 80 --type NodePort --dry-run -o yaml > front.yaml
$ vi front.yaml

###
apiVersion: v1
kind: Service
metadata:
  name: front-end-nodesvc
  selector:
    run: nginx
spec:
  type: NodePort
  ports:
    - port: 80
      targetPort: 80
      nodePort: 30200
###

$ kubectl apply -f front.yaml


# 3. 확인
$ ssh k8s-worker1
$ curl 000.000.000  		# 클러스터 내부에서만 쓸 수 있음
$ exit
$ curl k8s-worker1:30200	# nodeport를 이용해 외부에서 진입 가능
'Infra > Kubernetes' 카테고리의 다른 글
| [K8S/CKA 자격증] Storage - Volume mount (0) | 2023.01.27 |
|---|---|
| [K8S/CKA 자격증] Services & Networking - Network Policy, Ingress, kube-dns (0) | 2023.01.25 |
| [K8S/CKA 자격증] Worloads & Scheduling - Secret (0) | 2023.01.22 |
| [K8S/CKA 자격증] Worloads & Scheduling - ConfigMap (0) | 2023.01.22 |
| [K8S/CKA 자격증] Worloads & Scheduling - pod scheduling (0) | 2023.01.22 |
'Infra/Kubernetes' Related Articles
more


